Piezo haptics offers unparalleled levels of flexibility when it comes to integrating high definition tactile feedback in your next device. With our CapDriveTM piezo haptic drivers and off-the-shelf piezo actuators, like TDK Corporation’s PowerHapTM line-up, you can easily integrate better haptics to your new product designs and improve the user experience.

Piezo actuators can create very localized tactile feedback. Therefore, they are ideal to replace mechanical button with a high-fidelity experience where your user will either be impressed by the haptic feel or won’t even notice he’s not using a real mechanical button (yes, piezo haptics can be that convincing). In order to achieve the best results, you need to understand simple mechanical basic concepts.
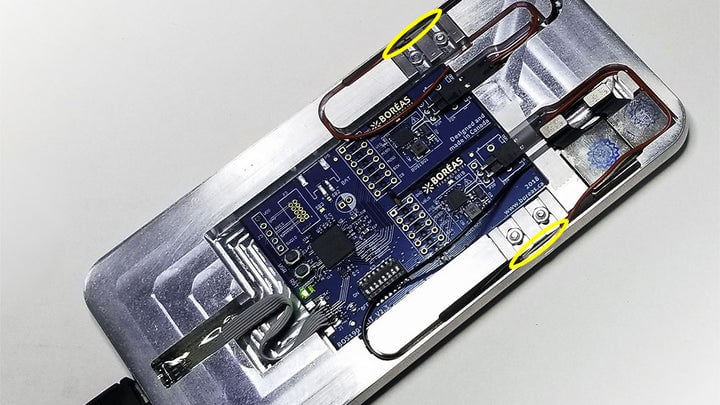
This article will focus on localized button replacement mechanical basics. You’ll learn how to maximize feedback force and the common challenges you may face while integration piezo haptics to replace buttons. The application we’ll use is the smartphone frame button replacement, just like we did on our SmartClik smartphone concept.
Piezo Haptic Solution Components
Let’s start with the basics: selecting the components to build our haptic solution. Keep in mind that the application we use as an example is a smartphone frame button. Your project probably have different needs and may require different components.
BOS1901 Piezo Driver with CapDriveTM Technology : Integrated Piezo Pressure Sensing
We talked a lot about our CapDriveTM technology and its impressively low power consumption, but there’s another useful exclusive feature to replace mechanical buttons, integrated pressure sensing within the piezo driver.

Exclusive to CapDriveTM drivers, this feature is using the reversible piezoelectric effect to detect voltage variation within the piezo actuator when pressure is applied on it. This means a CapDriveTM piezo driver can detect pressure and create feedback using the same piezo actuator. Ideal to replace a mechanical button since the user start by pressing on the actuator (like a normal button). The driver detects the pressure, then triggers the feedback to create the feeling of a clicking button.
This offers two advantages:
- You’ll save space because you don’t need pressure sensors. The same haptic actuator will act as a sensor. You won't need additional electrical components on your device’s PCB as well.
- You’ll reduce cost by eliminating redundant components.
This feature is protected by our Intellectual Property and is exclusive to Boréas’ CapDriveTM piezo drivers. You won’t find this advanced feature in other haptic piezo drivers on the market.
TDK Corporation Mini PowerHapTM Piezo Actuators
For this application, we recommend using TDK Corporation’s PowerHapTM mini lateral piezo actuators. They’re the smallest piezo actuators currently available on the market, they produce high amount of force with minimal displacement and their form factor make them easy to integrate in smartphones button replacement use cases.
Quality Button Haptic Feedback Mechanical Requirements
Back to mechanical basics. We covered in our article named Mechanical Fundamentals of Piezo Haptic Actuators the science behind motion and force. We invite you to read it if the following is unclear.
Using Newton’s second law of motion (F = m*a), we know why piezo actuators alone doesn’t work like an LRA or ERM. They generate high acceleration, but they don’t have significant mass. Therefore, you can’t bond it to a mass and expect to feel the whole mass vibrate (again, we go deeper in the mechanical science behind haptics in this article).
While you need to change your approach to move bigger mass with piezo actuators, they are perfect to generate localized high-definition tactile effects. Since your finger can sense the force from the actuator, you don’t need a mass to be involved. You only need three things to successfully integrate piezo haptics to replace buttons: to be careful with the rigidity of the frame wall that is between the actuator and the user’s finger, to protect the actuator from excessive force and to use the good frequency bandwidth in order to stimulate the finger’s mechanoreceptors.
Frame Rigidity Impact on Haptic Feedback
The frame’s wall rigidity will have a major impact on the piezo actuator’s haptic feedback quality.
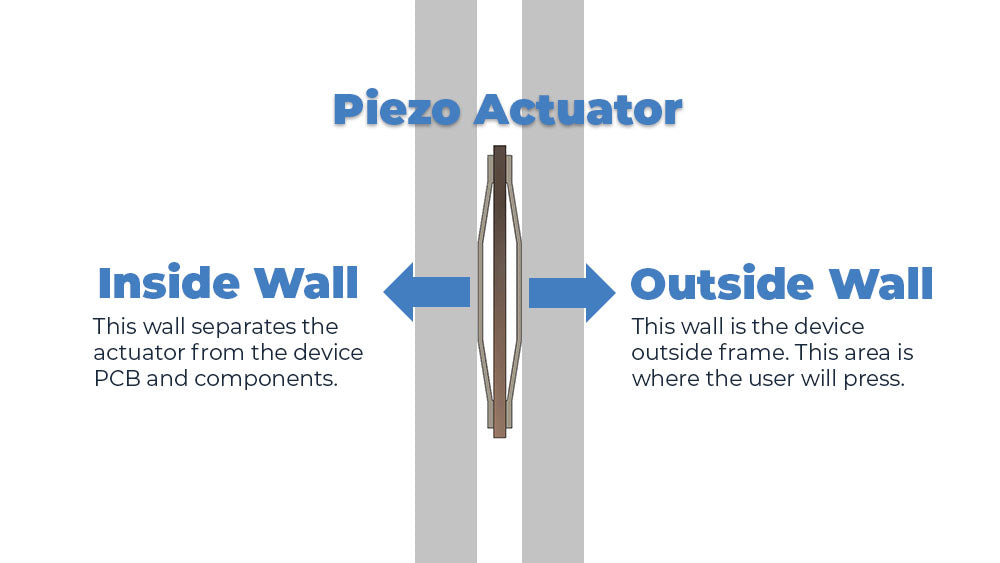
TDK PowerHapTM actuators use metal cymbals to create feedback (Again, we invite you to read Mechanical Fundamentals of Piezo Haptic Actuators to learn more on how they exactly work). The cymbals generate opposing force when voltage is applied to the actuator. If you are using one of the mini lateral actuators, it will basically be installed between two walls, one inside the frame and one on the outside. Those two walls rigidity levels will impact the quality of feedback. Let’s see why with Newton’s third law of motion.
Newton’s third law of motion: When one body exerts a force on a second body, the second body simultaneously exerts a force equal in magnitude and opposite in direction on the first body.[1]
Based on Newton’s third law of motion the less rigid of the two walls will deform when force is simultaneously applied on both by the piezo actuator (assuming both walls aren’t too rigid). The walls’ rigidity will also attenuate the actuator’s acceleration (and feedback quality). Let see what situation you may face while evaluating the walls’ rigidity.
-
The Two Walls Are Too Rigid for the Actuator
Result: The force (N) generated by the piezo actuator will not create enough deformation on any wall.
If the two walls are too rigid for the actuator, the user won’t be able to feel the force from the actuator, since there will be no displacement. Therefore, you won’t be able to replace a mechanical button. Plus, there is a high chance of failure from the actuator if the walls don't deform with it.
-
The Inside Wall Is Less Rigid Than the Outside Wall
Result: The piezo actuator force (N) will create a bigger deformation on the inside wall.
If the inside wall is less rigid than the outside wall, the inside wall will deform under the actuator’s force. Therefore, the feedback will be felt from the inside of the device, not the outside. Needless to say, this situation isn’t what we are looking for when replacing mechanical buttons with piezo haptics.
-
The Outside Wall Is Less Rigid Than the Inside Wall
Result: The piezo actuator force (N) will create a bigger deformation on the outside wall.
This is what we need for a good integration. Since the outside wall is less rigid than the inside wall, the feedback is felt from the outside. General rule of thumb, the less rigid the outside is, the more freely the actuator can move and better the tactile feedback is. Easy right? Your outside wall needs to be the less rigid in order to achieve the best haptic feedback. Well, not so fast! If your outside wall is too soft, you may face durability problems!
Protecting the Piezo Actuator From Excessive Force

Since the piezo actuator is bonded against the outside wall, it can be subject to absorb excessive force from various sources if the outside wall is too thin or not rigid enough. The user can press too hard on the actuator and break it if it isn’t protected. Your device may fail drop tests if the outside wall is too thin. You will need to find ways to protect the actuator from excessive force or increase the outside wall rigidity.
Fortunately, CapDriveTM drivers can detect voltage from minimal pressure. Frame rigidity can have an impact on pressure sensing, but it should be minimum. If you can feel haptic feedback, the piezo driver will be able to feel the pressure as well. You can concentrate on finding the right balance between protection and feedback quality. It won’t affect pressure sensing.
There is more advanced mechanical concepts that have both optimal feedback quality and protection simultaneously. Don’t hesitate to contact us at info@boreas.ca to chat with our team and learn more on the best integration for your application.
Ideal Output Frequency Bandwidth
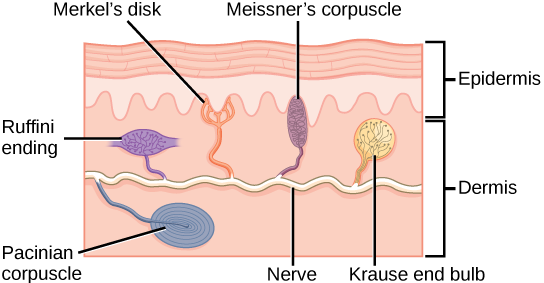
Image source: Somatosensory Receptors - Lumen Learning
Using piezo actuators to replace mechanical buttons doesn’t need to involve a mass. Therefore, it’s easier to integrate. Since you don’t have to find the mass natural resonance and because piezo actuators have a wide frequency bandwidth, you may be tempted to use the highest frequency the actuator can use in hope of having the strongest feedback available. Beware, because you need to factor in your finger mechanoreceptors, and they operate with their own optimal frequency!
The mechanoreceptors in your fingertips are called the Pacinian corpuscles and are responsible to detect pressure changes and vibrations. Their optimal sensitivity is between 200 and 300 Hz. Therefore, you need to operate the actuator in this frequency bandwidth to achieve the best tactile effects. The walls rigidity can affect that optimal frequency, so you may need to experiment and find the best feeling. You could also argue that the optimal frequency may change for every user. Fortunately, piezo actuators are extremely flexible since they operate with a wide frequency bandwidth. You could find the best performing frequency bandwidth and let the user choose his preference within the bandwidth via software. You aren’t limited by piezo haptics hardware like you would with an ERM or an LRA.
Need integration tips? We can Help!
We shared with you the basic mechanical concepts and challenges behind replacing mechanical buttons with piezo haptics.
If it feels like we only touched the surface, you are right. The best performing mechanical integration concepts we developed are protected by IP. Our mechanical engineering team can share more information with your team with an NDA in place. Our best concepts can amplify the feedback from the actuator to get the best effect quality while protecting it from excessive force and keeping the device’s frame sealed.
Don’t hesitate to reach us at info@boreas.ca to kick-start your next project with help from both our electrical and mechanical engineering team.
[1] https://en.wikipedia.org/wiki/Newton%27s_laws_of_motion
Leave a comment